Implementing Smart Client Tree Control
About Smart Client Tree Control
Smart Client Tree control extends SWING’s JTree base functionality and provides visual presentation to hierarchical data.

Tree Control Terminology
Tree Control Display
Tree control displays hierarchical data as an outline. Changes in the tree bound hierarchical data model are automatically reflected in the tree.
Tree Structure
A tree is constructed from nodes that can be identified by a tree path. Each node is optionally bound with a data model that contains the business data associated with the node.
Tree Path
A colon (:) separated list of nodes from the tree root node. The tree path is used to uniquely identify a tree node.
Static Node
Is described by a Static Template.
Recursive Node
Is described by a Recursive Template
Node Template
A node template specifies information regarding a specific level of a tree. It includes:
- The path to the bound data model
- A node control that is used for painting a node instance
- A list of child templates.
The tree has a hierarchy of tree node templates starting from the root template which defines the tree hierarchy meta structure. Templates are used for defining different node characteristics in a tree (Case, CR, etc).
Static Template
Its associated node has a fixed presence under its parent node, For example, nodes which serve as heading nodes are static nodes. If a static template has only static ancestor templates, it considered as pure static and has a fixed presence in the tree.
Recursive Template
A stub (place holder) template which refers to another non recursive template.
At runtime the place holder is replaced with a proxy to the referenced template.
Recursive templates are used for models that have a recursive pattern e.g. organization hierarchy.
Root Node
The outer most parents for all the tree nodes. The root node has a mapping to an underline form hierarchical data model root. Each tree has a single root node.
Node Types
A node can be a leaf node or a container node,
Leaf Node
Leaf node is defined as node that is not eligible to have children.
Container Node
Container node is eligible to have children but does not necessarily have ones.
In order to display the child nodes for a specific container node, the container node should be expanded by clicking the expansion handle or by using appropriate method on the tree application events handlers.
Level Loading
Ability to load node level data only when needed. Tree supports level by level loading by using template level associated submit action.
Context Menu
A popup menu which is attached to a tree node. It is triggered by right click on the relevant node. The Tree control allows customizing different contextual menus for different node types.
Canceled Events
Both tree expanding and tree collapsing can be voided by cancelling the respective event.
Implementing Simple Tree
In order to illustrate the implementation, let’s use the following Topics logical data model structure.
The Topic logical data model is build of a simple hierarchical data as illustrated in the picture above.
Creating Smart Client Data Models
First we need to create smart client data models and relate them to create the hierarchy.
The following picture describes these data model hierarchical structure (leaf nodes are not shown):

The above data models specification are created as follows:


Creating the Data Models
We now create the data models in the Smart Client designer.
- For simplicity we define our data models manually and set their fields values at design time.
- The top data model is a single record; all other data models are defined as tabular or set of records.
- Tabular set of records can be used either as container nodes (parents of other related set of records) or as leaf nodes (those which do not have children).
- Each record in the data models (both singular and tabular) contains the following fields:
- Id
- Name
- For simplicity we shall provide all names at design time as per our above design (see data models definition pictures bellow).
- Note that the designer allows creating data models, but as of release 7.5.2 it still does not support hierarchical visual definition. We shall create the model hierarchy programmatically in the next section using a third field called ‘properties’, ‘vehicles’, ‘people’, ‘fruits’, ‘colors’, ‘cars’, ‘motorcycles’, ‘bicycles’.

GlobalTopDM

PropertiesTDM

VehiclesDataTDM

CarsTDM

PeopleDataTDM

FruitsDataTDM

ColorsDataTDM

Creating the Data Model Hierarchy
As explained before, the data model hierarchy is not set at design time, but rather we create this model hierarchy programmatically using new fields, one for each hierarchy;
The following picture show these fields in a dashed bordered white boxes (‘properties’, ‘vehicles’, ‘people’, ‘fruits’, ‘colors’, ‘cars’, ‘motorcycles’, ‘bicycles’).

The hierarchy field (we name it arbitrarily for each hierarchy level) is created dynamically at run time while the hierarchy is being defined. The form_Load event is used for creating the model hierarchy.
The following hierarchy level field names are used: ‘properties’, ‘vehicles’, ‘people’, ‘fruits’, ‘colors’, ‘cars’, ‘motorcycles’ and ‘bicycles’

Creating the Tree
Root Node
Select Tree control from the tools pallet:

And place it on a panel:

Note that when installing the Tree control, root template and context menu are automatically installed as well.
Tree Root Properties
The Tree Root properties are set as the following:
highlightMode – Set to SINGLE to allow only single node to be selected at a time.
rootVisible – Set to ‘Yes’. This will make the root node visible.

Next we set essential root node template properties:
autoExpand – sets the root node default behavior (expanded: reveal its leaf nodes),
dataModelMap – single (none-tabular) record data model attached to the Root node.
Root Control Properties
Other properties set the node control run-time behavior:
closeIcon, leafIcon and openIcon properties set the path to each of these states.
Text Binding Data:
dataModel:
<leave empty> the data model is the root data model map (see above).
fieldname:
Data model map field bound to data model map. The field contents will be displayed alongside the root.
Activation action:
Set the node action when it is double clicked. This action can be shared by several nodes. It can identify the double clicked node name and perform unique activities relevant to specific nodes (see the code bellow).

The node Activation Action event handler code:

Adding Tree Levels
For each level below the root node, we add a node template. The node template properties contain control properties.
Properties Node Level
Next we add the next level node template nodeProperties template and set its main properties:
First we select a Tree node

We then add the Properties node template bellow the nodeRoot template:

We now set the nodeProperties template and control properties:
Note the following:
The dataModePath (marked in blue) property is set to the hierarchy field path between this node template (nodeProperties) data model and its parent data model.
We then add the Properties node template bellow the nodeRoot template:
- Parent node Template: nodeRoot Data Model: GlobalTopDM
- Node Template: nodeProperties. Data Model: PropertiesTDM
- Hierarchy field path: properties (set programmatically by form_Load event).
- Full Hierarchy path: GlobalTopDM:properties
We bind the text control to the field ‘name’ at PropertiesTDM. We do not need to explicitly set the binding data model, since it is implicitly derived from the dataModelPath.
We also set the controls’ state icons (openIcon, leafIcon, closeIcon etc) and set our common activationAction to ‘nodeActivationAction’ as we set in the parent nodeRoot template.

Next we add, in a similar way, the second and third level templates of our model hierarchy.
- Level 2 node templates: nodeVehicles, nodePeople, nodeFruits, nodeColors
- Level 3 node templates: nodeCars, nodeMotorcycles, nodeBicycles

Level 2 Node Templates
nodeVehicles template properties

nodePeople template properties
Note that the activationAction remains empty. This will prevent any response to a ‘double click’ on any of the nodePeople (rendering PeopleTDM) leaf entries.

nodeFruits and nodeColors templates properties look similar to the above nodePeople template properties, except for the dataModelPath property which is set to:
- nodeFruits dataModelPath: fruits
- nodeColors dataModelPath: colors
Level 3 Node Templates
nodeCars template properties

nodeMotorcycles and nodeBicycles templates properties look similar to the above nodeCars template properties, except for the dataModelPath property which is set to:
- nodeMotorcycles dataModelPath: motorcycles
- nodeBicycles dataModelPath: bicycles
Testing SimpleTree Control
Our SimpleTree Control is now ready to render the Topics data model:

Getting Selected Node Information
Now, after we managed to view the full data model displayed in our SimpleTree control, it’s time to provide additional functionality that will allow accessing the selected (highlighted) node information.
The following expression provides a simple way to access the last selected node.
For example:
String NodeName = SimpleTree.getFocusedNode().getLastNode().getNodeDM().getStringValue("name");
Adding Functionality
The Topics model we used in this example use static nodes; the records contained in the data models are set at design time.
Real life scenarios often require the ability to change data models contents at run-time; it may require adding or removing either leaf or container nodes.
We now add the following functions:
- Ability to add a leaf node
- Ability to remove a leaf node
These functions will be implemented on the ‘Cars’ container node;
- Right clicking on the Cars container node will allow adding a child leaf underneath the container node.
- Right clicking on any of the cars leaf nodes will allow to remove the selected leaf node.
Adding Contextual Menu Items
By now you probably have noticed that while adding a Tree control, it automatically installs a root node template and a menu attached to it. Similarly, a menu it attached to each additional new level node template.
These menus are inactive as long as they do not contain any menu items. Adding a menu item to a tree level menu will allow displaying this menu item within a contextual menu when right clicking the relevant node children.
Note: a level node contextual menu will be activated on its children.
Our goal is to have two contextual level menus:
The first context menu should be displayed when right clicking the Cars container menu:

The second context menu should be displayed when right clicking on any of the car leaf nodes

Adding menus
As already mentioned above, any context menu which we would like to be displayed when right clicking on a node (container or leaf), should be installed on the node’s parent node. Thus, the menu will be shared by all nodes at the same level.
We would like to have the first menu displayed when right clicking on the Cars container node. Therefore we shall install the ‘AddChild’ menu item on the Cars’ parent node Vehicles. Naturally, this menu will also be available on the other two nodes sharing the same level: Motorcycles and Bicycles. Later we can programmatically take care for any different behavior required for the other two nodes.
AddChild Menu
Let’s first pick the menu item tool:

Drag and drop the menu item and add it to the Vehicles menu:

Menu Item AddChild Properties:

Note that the text property is static and will be displayed ‘as is’ on all level nodes (Cars, Motorcycles, Bicycles). We can easily bind the text property to the underlying data model (boundDM) to reflect the node which was right clicked.
Merely displaying these context menus is not enough. We need to set an action handler to perform the required task. We set the ‘action’ event to the event handler to perform the task.
The AddChild() method will handle the actual task. The AddChild() method is discussed bellow.
Menu Item AddChild events:

The MenuItemAddChild activate event handler (method name changed for clarity):

RemoveCar Menu
The second menu will be displayed when any car leaf node is right clicked. The ‘RemoveCar’ menu item will be installed on the container node Cars. This menu will be shared by all the children of the Cars node.
We select the Menu Item tool, drag and drop to add it to the Cars node context menu:

Menu Item RemoveCar Properties:

Menu Item RemoveCar Events:

The MenuItemRemoveCar activate event handler (method name changed for clarity):

Add Child Method
Smart Client development convention follows the MVC (model view controller) paradigm. It recommends avoiding direct manipulation of UI controls. It is always recommended to perform any necessary changes in the UI bound data model. This recommendation applies to tree nodes as well.
Therefore, our goal is simply identify the tabular data model (record list) that models the leaf nodes to which we would like to add an entry.
Let’s review the Add Child method:
The first part of the code is very typical and covers the following steps:
- Identify the selected tree node (retrieving the path to it and use the path to identify current tree node).
- Identify node’s template and its dataModelPath. The template’s dataModelPath defines the hierarchy field in the node’s parent data model (usually this is a record in a list of records defined in parent tabular data model).
- Access the node’s bound data model needed later.

The second part of the code performs the following steps:
- Get reference to the node’s children TDM (tabular data mode).
Identifying the children TDM is done via the node’s bound data model hierarchy field. This field contains a reference to the children’s tabular data model (TDM to which we shall later add a new record). Usually we can find this hierarchy field easily via any of the children’s dataModelPath.
Unfortunately the above method does not always work for us. It fails to provide an access to the bound data model Hierarchy field and related TDM in case the selected node is a container node (i.e. a node that is supposed to have children) but has no children yet (this might happen if all children where previously removed; there is still an empty Tabular Data Model to which we need to add a child’s record (data model row).

- To address the ‘empty container node’ scenario, we need to explicitly search the for the children hierarchical field in the bound data model. We call the getHierarchyField() method (see third code segment) to perform this search for us.

The third AddChild() code segment performs the actual child addition.
It creates a new temporary single data record and filles its fields as follows:
‘id’ – – a sequential number
‘name’ – the container name plus a sequential number (i.e Car_6)
Finally it adds the newly created data model record to the children’s tabular data model. Once added, the tree control display will be automatically refreshed and a new child leaf node will be displayed.

Testing AddChild Functionality
Here is a sample test run:

RemoveNode Method
The node removal task involves the following steps:
- Identify node bound data model boundDM (elaborated above in AddChild() code example).
- Identify parent tabular data model.
- Remove the bound data model (record) from its container (the parent TDM).

Recursive Node Templates
In the first part of this discussion we described a simple tree. The tree structure is static; its structure is defined at design time and cannot be later changed.
Quite often there is a need to address business scenarios that require supporting a dynamic tree which may contain any number of nodes, to any level or structure.
Recursive template provides the mechanism to use a single template definition with many nodes in any tree structure as needed. Thus, the tree structure can be dynamically changed at run time by modifying the data model programmatically.
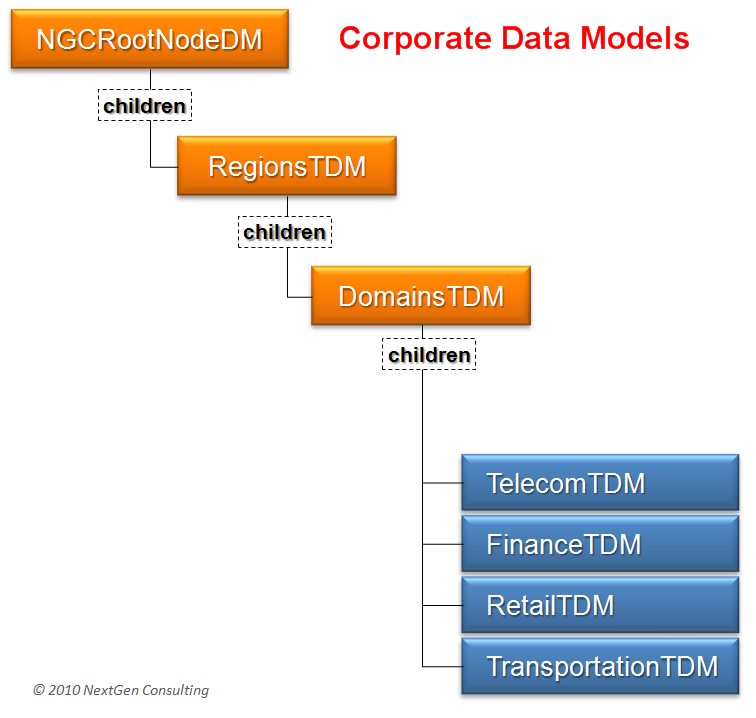
Corporate Logical Model
The following organizational tree structure illustrates an organizational tree. ‘NextGen Consulting’ has four regions; each has its own similar sub-tree structure.

Using Data Models
To reflect the above real-life structure, we shall programmatically create the following set of hierarchical data models:

The above data models are described in the following table:

Creating the Data Models
We now create the data models in the Smart Client designer.
- For simplicity we define our data models manually and set their fields values at design time.
- The top data model is a single record; all other data models are defined as tabular or set of records.
- Tabular set of records can be used either as container nodes (parents of other related set of records) or as leaf nodes (those which do not have children).
- Each record in the data models (both singular and tabular) contains the following fields:
- Id
- Name
- For simplicity we shall provide all names at design time as per our above design (see data models definition pictures bellow).
- Note that the designer allows creating data models, but as of release 7.5.2 it still does not support hierarchical visual definition. We shall create the model hierarchy programmatically in the next section using a third field called ‘children’.

NGCRootNodeDM

RegionsTDM

DomainsTDM

TelecomTDM

FinanceTDM

RetailTDM

TransportationTDM
![]()
Creating the Data Model Hierarchy
As in the SimpleTree example, we shall use the Form_Load event to create the data models hierarchy.
Note: We could have also create and populate the data models programmatically, but preferred to accomplish this task in the Smart Client designer for simplicity.

Creating the Tree
Root Node
Select Tree control from the tools pallet:

And place it on a panel:

Note that when installing the Tree control, root template and context menu are automatically installed as well.
Tree Root Properties

Root Node Template Properties

Children Nodes Template Properties
Note the following:
- The ChildrenNodes Template will be used by ALL tree control child nodes.
- Therefore the dataModelPath property is ‘children’. This hierarchy field is used by all data models. Its value references their respective children.
- The recursiveTemplteName property is set to root template ‘GlobalNode’.
It means that ChildNodes template should act as a place holder for a runtime proxy that refers to the recursive template.

Testing Recursive Tree Control
Our SimpleTree Control is now ready to render the Corporate data model:

That is the end of this discussion.
In the next part of this article we shall try to implement the concepts covered so far to create Hierarchical Grid and Hierarchical Search Grid.

11 Comments »
Leave a comment
About
Welcome to NextGen Consulting.
We provide IT consulting services to organizations that use either Microsoft Dynamics 365 or Amdocs CRM (or legacy Clarify) platforms.
Having over 17 years with full life cycle of CRM projects (Dynamics 365 / Power Apps, Amdocs CRM / Clarify), broad enterprise and telecom industry knowledge, in-depth experience with OSS / BSS, CRM, Service Assurance, Marketing and Sales business processes, we offer flexible variety of services aimed at both the telecom and the enterprise organizations such as:
- Provide complete turn-key solutions ( Amdocs Smart, Thin, Classic clients, Microsoft Dynamics CRM)
- Subcontract Design and development
- High level business design and documentation
- Detailed level technical design and documentation
- Develop design to a deliverable solution using agile methodologies
- Improve user experience (UI design and implementation)
- Design and Development Management
- Create user workshops for business analysis and requirements gathering
- Provide training for developers and business users
- Design complete solution architecture
- Inspect external provider deliverables
Our people have hands-on implementation expertise with implementing various business processes using rich selection of front end technologies such as Microsoft Dynamics CRM and Amdocs CRM (Smart Client, thin client, and Clarify Classic Client).
We can use this expertise to help your organization migrate existing legacy application to a newer platform, or simply provide any level of design (high level, low-level) and implementation to fit your organization needs.
Join our LinkedIn Smart Client Group to get immediate updates and share your ideas, needs and comments.
See more on Yuval Rashelbach.
For further information view profile at http://il.linkedin.com/in/yuvalr
or contact Yuval Rashelbach at yuval.rashelbach@nextgencon.com

Oh, thanks yuval
It’s very useful, it helped me very more
thanks yuval one more 🙂
Good post, thanks.
Thanks for the info, very inspiring piece!
As a Newbie, I am always searching online for articles that can help me get further ahead. thank u…
this is beyond great
I’m really looking forward seeing the Hierarchical Grid and Hierarchical Search Grid. examples… thx yuval!!
Use the examples above. I hope it will help you in your implementation.
Yuval
good stuff. giving me ideas
Thanks for one’s marvelous posting! I certainly enjoyed reading it, you are a great author.I will be sure to bookmark your blog and will often come back later on. I want to encourage you to definitely continue your great posts, have a nice evening!
What’s Happening i’m new to this, I stumbled upon this I’ve found It absolutely helpful and it has helped me out loads. I’m hoping to contribute & assist other customers like its helped me. Great job.
Hi there friends, good post and good urging commented at this
place, I am really enjoying by these.